Hey there, BunnyBunch!
Would you like to learn a quick and easy way to draw a realistic picture of a rabbit?
Here’s a simple guide to draw a realistic and cute bunny, regardless of your artistic experience.
How do you draw a bunny?
To draw a rabbit, start in the middle or on the right side of your page. We recommend using a pencil for this drawing so you can erase all unnecessary lines afterwards.
For the Head:
- Draw a circle. (This will be your “Head Circle”)

For the Eye:
- In your Head Circle, a bit up and to the right of the center point, draw a small circle for the eyeball.
- Elongate the shape of the eye from a circle to an oval, by adding arched lines
for the upper and lower halves of the eyeball.
- Add a dark circle in the center for the pupil, and a lightly shaded circle around it for the iris.

For the Nose & Mouth:
- Next to the circle on the lower right side, draw a mark for the tip of the nose, then connect that to the Head Circle with smooth arched lines.
- At the tip of the nose, draw a wide “Y” shape for the nose, connected at the bottom to a line that slants down to the left for the mouth.
- Add whiskers at faint curved lines of definition to the snout
For the Ears:
- From the top of the Head Circle, draw an oblong shape to the left that’s rounded on top and connects to the Head Circle at the base. This oblong shape should be a bit less than half the width of the head, and it’s Ear #1.
- For Ear #2, starting halfway up the right side of Ear #1, draw another oblong shape, a bit thinner than the first, and connect this shape to the Head Circle as well.
- Add a long faint diamond inside Ear #1 for the inner ear.
For the Body:
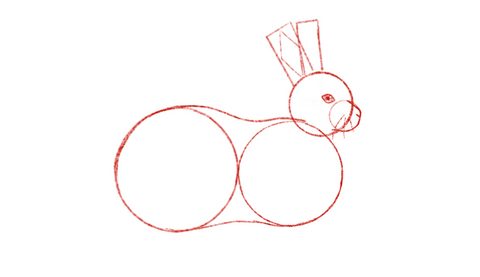
- Without drawing the overlapping lines, draw a new circle beneath the head, about twice the size of the head, with the top arc positioned so that it would intersect the lower part of the Head Circle, but curved underneath the nose arc. (This will be “Body Circle 1”)
- Attached to the left arc of Body Circle 1, draw another slightly larger circle. (This 2nd circle will be the rear end of your bunny and we’ll call it “Body Circle 2”)
- Now connect both body circles with two long curved lines.
For the Feet:
Hind Foot
- Underneath Body Circle 2, draw a horizontal oblong shape for the hind foot, that’s curved on top, and flat on the bottom. This shape should start around the middle of Body Circle 2, and extend just past the beginning of Body Circle 1. (This shape is totally underneath the two Body Circles, and while the edges can be close, they shouldn’t overlap.)
- Add an additional partial arc at the right edge of this foot shape to separate the toes.
- For the heel of this hind foot, you connect the foot shape to Body Circle 2 by drawing the heel with a shape like an italic “D” .
Front Feet
- On the right side of the hind foot, draw two smaller oblong dome shapes for the front feet, side-by-side. These feet should be about ¼ to ⅓ the size of the hind foot.
- Add 2 additional partial arcs at the right edges of each front foot to make 3 separate toes on each.

Final Touches
- Now extend the lower left side of Body Circle 2 so that the outer curve connects with the back of the Hind Foot.
- Darken all outer lines, while erasing all unnecessary internal lines.
- Shade your bunny as desired, with pencil strokes all going in the same direction, from the head to the tail.

Et Voila! What a beautiful bunny you’ve made!
See you next time, BunnyBunch!
~ BunnyDad
